Sunday, August 20, 2017

How to: Last minute, all-expenses-spared yogurt pinhole solar eclipse viewer

I'm not going to be able to see the totality because my priorities are obviously wrong. 

But I still want to see as much of the eclipse as I can, so I made this yogurt container solar viewer today (the day before the eclipse) at 6pm (much later and I wouldn't have been able to test it before the 21st). 

You'll need:

  • some blank white paper
  • aluminim foil
  • a yogurt container
  • scissors / knife
  • a pin or needle or nail
  • optional tape 

1. Cut out the bottom of the container

2. trace and cut a piece of paper the same size as the lid. Put the paper inside the lid.
 3. Cut out a little door from the edge of the container down the side. This will be your viewing port.

4. Now wrap the yogurt container in a layer of aluminum foil. This makes your viewer opaque.
 5. Using a pin, create a small pinhole in the top of the viewer (what was once the bottom of the container)
 6. Your viewer should now look like this.

7. Run outside and test your solar viewer! That little round dot is the sun. You can make it larger by moving the lid further away from the container.

Tuesday, August 8, 2017

3D printed meal prep: speed up your mornings with custom scoops!

We actively look for ways to reduce the amount of time we spend on chores so we can spend more time on fun and togetherness.

One thing we stumbled upon is meal prep for breakfasts. Since our weekday breakfast has become pretty standard, in fifteen minutes one person can make breakfast for the entire house for the whole week! Suddenly our mornings become more flexible - we can spend more time hanging out and eating breakfast together, or we can grab breakfasts as we dash out the door and eat them at our respective offices, allowing us all to get home sooner.

Our current recipe:
1/2 Cup old fashioned rolled oats
1 Tbsp flax meal
1/8 Cup seeds or nuts (usually sunflower)
1/4 Cup chopped fruit or berries (we're currently using frozen blueberries)
1/3 Cup whole milk plain yogurt
Combine in instagram-ready layers with yogurt on top. Store in fridge until ready to eat - the oats will be delightful after 18 hours. After about 5 days, things begins to get too mushy.

We constantly tweak the recipe as fruit comes into season and we find interesting nuts / seeds / grains on sale.

To speed this process even further, I 3D printed custom scoops for the oats and seeds using wstein's wonderful customizable measuring cup/scoops. I made and labeled a 4 ounce scoop for oats and another 1 ounce scoop for seeds. The labels are a little hard to see in the photo, but the whole project turned out very nicely!

Wednesday, February 10, 2016

Truck Storage Console Repair

Here's a fun project that combined 3D printing, auto repair, and wood work:
Replacement console cover for a '97 Ford Ranger pickup truck.


Motivation:

My truck has a broken center console cover. This was one of those small annoyances that made my daily life slightly more miserable than necessary: I didn't have an arm rest while driving and anything stored in the console tended to drift around the cabin. If I ever needed to raise the console for three people to sit, everything dumped out between the seats. I ended up tying it closed with a length of string, which would inevitably slip off at the worst moment, flipping the spring-loaded cover open.

Even used replacement parts for this thing are wildly expensive, so I decided to fabricate a replacement out of spare plywood and wood plus a 3D printed clip.

The idea of having a bit of wood trim in my super cheap pick up truck seems impossibly, hilariously luxe.

Fabrication 1: Wood

The top was easy enough - just trace and cut with a jigsaw, then route the upper edges with a 3/8" roundover bit.


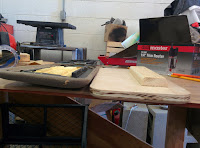
The next bit was slightly harder - the hinge doesn't connect to the top with a 90 degree angle, so I cut an adapter from some spare 1 by 4 by matching the angle on the plastic to the table saw blade. The end result wasn't precisely the right angle, but it was close enough. I could have made the wooden adapter smaller, but I didn't want to risk splitting due to repeated stress and heat.

I dry-fit the pieces and screwed them together for a quick test, then disassembled everything so I could sand down to 200 grit and apply some pre-stain and three coats of polyacrylic. I chose polyacrylic instead of (more durable) polyurethane because pickup truck cabs are tiny and very hot, and polyacrylic releases fewer fumes than polyurethane.

Fabrication 2: 3D design and print


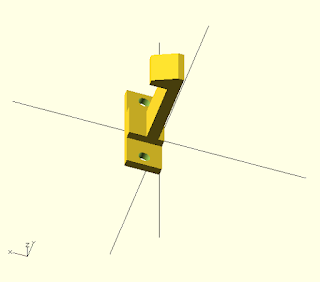
The final step was to 3D print a replacement clip to keep the lid closed. I don't know exactly what the original one looked like, but I made some guesses based on measurements of where it is supposed to go and some photos of replacement parts.  It took only four iterations of printing, making an adjustment, and reprinting before I was happy with the results. I definitely appreciated the openSCAD paradigm for making those measurement adjustments quick and painless.

Since this is such a dimensions-driven project, instead of firing up a GUI-based cad program, I decided to use this project as an excuse to learn a little more openSCAD syntax. So with this cheat sheet's help, and a few iterations with the 3D printer, I was able to make a cute little clip that screws into the lid of my console with about 19 lines of code.

Final assembly and testing.
I like the look of red plastic against light wood, and there's no way to hide the clip, so I chose to highlight it in red instead.

The end result works! I now have a pleasant place to rest my arm while driving, and when I need more seating, the contents of my console don't go everywhere!


Monday, October 5, 2015

Is your chair missing feet? I'd like to fix it for free.

Announcement:

New service: 3D printed replacement chair feet: bring me your broken or missing chair feet!

If you have a chair that needs replacement feet, drop me a line, perhaps I can help you keep your chair out of the landfill.

Background

For the past two years, I have made and sold 3D printed replacement feet for the IKEA Gilbert chair. It has been a fun side project that allows me to prevent broken chairs from going into the trash heap.

Discussion:

I was recently contacted by a lovely person named Joy who saw that I sold chair feet for the IKEA Gilbert chair, and wondered if I could make replacement feet for her chairs, too?

My answer was yes, if your chair feet are easily 3D printable.

Which made me realize that perhaps I should actively look for additional chair feet that can be 3D printed, to expand my offerings.

So, if you have a chair with missing feet and I don't already make those chair feet, let me see if I can help!

Just like I did with the IKEA Gilbert chair feet, I'll both release the files so anyone with a 3D printer can make their own, and I'll sell feet so people who don't have access to a 3D printer can keep their chairs from becoming landfill.

Details of the deal:

  1. You contact me here.
  2. I'll get back to you via email and ask you to send me photos of your chair's feet, and some rough dimensions.
  3. If I think they'll work, I'll ask you to ship me one of your chair feet (or more, if your chair feet aren't all the same for some reason).
  4. After a week or so, I'll return your chair foot, plus the 3D printed feet you need (for free).
  5. I'll then post the files online (with the creative commons attribution, non commercial license) so anyone can make their own chair feet.
  6. I'll sell the feet on the replacementfeet.simpleswitchlabs.com website.

Monday, June 29, 2015

Glass frame screw caps for exterior house doors

The rear entry area of our home is very dark, so we decided that an easy way to add light was to replace our old, drafty, malfunctioning rear entry door with a modern door with a glass panel to allow more light.

Our first problem was that our rear door happens to be pretty small - 30 inches wide.
Most exterior doors are now 36 inches wide, so to get what we want, we'd have to special order at about three times the cost of the doors in stock at our local stores.  My partner in crime had the brilliant idea of searching craigslist for 60 inch wide double entry doors, since that would give us a door with exactly the width we want (and an extra door to do something with?).  With a little patience, we located a set of used wooden entry doors, so we took our new door home to strip off paint, fill in holes, and generally clean everything up.
Missing screw caps in the glass frame

Second problem: the screw caps were missing from the frame around the glass in the door.
I first went to Lowe's to ask if they had those caps and was told that no, no ones sells them, they come with new doors, and nowhere else. I searched the internet and found that the guys at Lowes were right, those caps can't be purchased!
So, I took some careful measurements, 3D printed some screw caps in white ABS, popped them in place with a mallet, and they look great!


gently tapping in with a mallet


18 new screw caps
Caps in place

Monday, June 15, 2015

Archery Bow Square

I've recently begun learning archery.

When you receive your first bow, one of the first things you need to do is set it up by adjusting the brace height, and add a nock point to your string.  I'm not going to explain here how to do those things as I'm just a rank beginner.  To accomplish those tasks yourself, you'll need a tool called a Bow Square, it lets you both measure the brace height and find the proper placement for your nock point.

These aren't expensive tools, you can find aluminum bow squares for as little as $15 online, but designing and cutting my own was a fun project, and was a good excuse to further acquaint myself with 10BitWorks' new 80Watt Rabbit Laser engraver.

I designed in Inkscape, exported to DXF and used LaserCut 5.2 to communicate the actual cuts to the machine.

Monday, January 5, 2015

How 3D printing saves time and money

It's been close to a year and a half since I purchased my current 3D printer (it cost about $1200 at the time, but you can pick one up for about $950 today), and I've lost track of how many times over it has paid for itself, but here's a list of some ways my printer has paid for itself around the house:
Ceiling fan with 3D printed globe retainer clips